“Hear the lively song of the frogs in yonder pond…krick- krick- krickity- krick berrruuuum. Sounds like someone hammering.
All For A Gardener
Posted 310 weeks ago
It’s Raining-What to do next?
Some days the weather is just too inclement to be outside. Now that I find myself with lots of time on my hands, I am binge watching Netflix and Prime, and (don’t tell) playing games on my i pad or phone. My favorite: Lily’s Garden. While this is tons of fun, and a great way to idle away hours; be careful of those in app purchases.

Before I knew it I was throwing my grocery money away. That is when I discovered U-TUBE has game walk-throughs…Of course if you are under 35 years old you knew this.
What a blessing! I was able to see the story all the way to the latest level. Which is what kept me playing the game. I just had to know if Lily got to keep her inheritance. (And if she got together with her neighbor.)
Posted 310 weeks ago
 nest of baby bunnies
 unexpected surprise!
Posted 325 weeks ago
Social Distance? Spend time in your garden!
In these crazy times with the serious concern over covid19; a lot of us have found ourselves temporarily out of school, or out of work, or worse. What better time to spend in the garden!

Plan a new garden or redesign an existing one. Take time to clean up and weed beds, put down mulch and make some plantings. If you live in the south anything goes. If you are in the north refresh the soil. Perhaps plant bulbs that will bloom later in summer. Build some raised beds, or better yet build a hydroponic garden. That would certainly help with groceries in the future!

While most of my plants cannot be moved outside until May, I can do a majority of prep-work now. I am pruning away dead wood, cleaning up and making plans for this year’s gardens. One of the tasks I will work on is to prune my Crepe Myrtles.
Late winter (right now) is the best time to prune a Crepe Myrtle, because it is leafless and you can easily see all the branches. It also blooms on new growth, so pruning now won’t reduce blooming. In fact, it may increase it.

Tips how to prune a Crepe Myrtle Tree. Remove branches in the following order:
1. Suckers coming up from the base.
2. All side branches growing from the main trunks up to a height of at least 4 feet.
3. All higher branches growing inward towards the center of the tree.
4. All crossing, rubbing, and dead branches.
5. Branches growing at awkward angles that detract from the tree’s appearance.
Always
cut back to a larger branch of the trunk. Don’t leave stubs. Removing
seed-heads on the end of branches is optional. Leaving them doesn’t
reduce blooming. I leave mine. In August, enjoy it’s beautiful blooms.
Posted 326 weeks ago
 LEU GARDENS, Orlando, FL


Posted 326 weeks ago
Roses
I have never really included roses in my garden. I am told that rose care is easier than you think—anyone can grow them successfully. This year I found a beautiful salmon orange colored rose at the local shop and I brought it home.

TIPS FOR GROWING
Plant your roses in a sunny location with good drainage. Fertilize them regularly for impressive flowers. Water them evenly to keep the soil moist. Prune established rose bushes in early spring. And watch for diseases like powdery mildew or black spot.
If you’ve been afraid to start a rose garden, the truth is, roses are no more difficult to care for than other flowering shrubs. Follow these ten essential rules to grow your own beautiful roses:
1. Know your roots
Roses can be bought already potted in soil or as dormant bare-root plants. Each type has benefits. If you’re a novice rose grower, like me, container roses are a great way to go because they are easy to plant and establish quickly. They can also be purchased at local nurseries throughout the growing season, allowing you to plant them when climate conditions are ideal.
Bare-root roses arrive dormant. They offer the widest selection of varieties, but require more care and attention months after planting. One of the biggest advantages of bare-root roses is the greater selection of varieties available. In addition, bare-root plants are an economical and convenient way to order plants by mail that you can’t find at a local nursery. Unlike container roses, however, bare-root plants need to have their roots soaked overnight in water before going in the ground, and the roots must be kept moist the first few months after planting.
2. Don’t overdo it
There are numerous classes of roses, ranging from micro-miniatures to
grandifloras and from ground covers to climbing roses, with some classes
containing hundreds of varieties. While it may be tempting to fill your
rose garden with a wide assortment, you are likely to end up with a
disorderly array and too many plants for the space. A few well-chosen
varieties will give you far more satisfaction than dozens of mismatched
plants that don’t work in harmony.
3. Find the right site
For the healthiest plants and abundance of flowers, roses need six to eight hours of sunlight daily. In hot climates, roses do best when they are protected from the hot afternoon sun. In cold climates, placing your rose bush next to a south or west facing fence or wall can help minimize winter freeze damage.
Roses thrive in well-drained soil that is rich with organic matter. In heavy clay soil, mix in compost, peat moss, and other organic matter to improve drainage. In lean, sandy soils, adding compost will help to retain moisture near the plant’s roots.
4. Time it right
The best time to plant roses is in the spring, after the last frost, or in the fall at least six weeks before the average first frost in your area. This gives the roots enough time to burrow into the soil before the plants go dormant for the winter.
Bare-root roses are typically available only in early spring and should be planted soon after you bring them home. Roses growing in containers give you more flexibility in planting time and can go into the ground whenever climate conditions are agreeable. For the best results, plant roses on a calm, cloudy day. Planting on a hot, sunny day or during a summer heat wave can stress any type of plant.
5. Dig deep
The size of the hole in which you plant your roses is one of the key factors to getting them off to a good start. Whether you are planting bare-root or container roses, you need to dig a hole deep enough and wide enough to accommodate the plant’s roots and to allow for good drainage, since roses don’t like wet feet. If you are planting several rose bushes together, space them at least 3 feet apart to give them ample growing room.
Mix a generous amount of garden compost, peat moss, or other organic matter with the soil that was removed from the planting hole. Use some of this mixture at the bottom of the planting hole and place the plant. The rose’s crown should be at ground level in mild climates, and 2 to 3 inches below ground level for cold climates. Fill the hole partially with the soil mixture and add a slow-release fertilizer. Water thoroughly, and then finish filling the hole with the remaining soil. Water again, then mound loose soil around the canes to protect the rose while it acclimates to its new site.
6. Feed often
To produce an impressive show of flowers, a rose bush needs to be fertilized regularly. Organic methods provide a slow, steady supply of nutrients. Monthly applications of compost, composted manure, and other organic and natural fertilizers, such as this organic fish emulsion, work well. Organic amendments also help to encourage beneficial soil microbes and a well-balanced soil pH.
Slow-release fertilizers, like Organic Fertilizer Spikes, supply the right balance of nitrogen, phosphorus, potassium and other minor nutrients and also give rose bushes the nourishment they need for optimum growth. The nutrient content in synthetic fertilizers is higher than what you’ll find in organic amendments, so fewer applications are necessary - typically once in the spring and once in the fall. For newly planted bare-root plants, apply organic amendments to the soil at planting time, then wait until after the plant has produced its first blooms to apply chemical fertilizers so you don’t burn the new roots. Whatever type of fertilizer you use, be sure to follow the product label for quantity and frequency of application.
7. Water wisely
Roses do best when soil moisture is kept uniform throughout the
growing season. The amount and frequency of watering will depend on your
soil type and climate. Roses growing in sandy soils will need more
watering than those in heavier clay soils. Hot, dry, and windy
conditions will also parch roses quickly. How you water is as important
as the frequency. Water at the soil level to
avoid getting the foliage wet prevents disease
such as black spot and powdery mildew. Using a soaker hose is recommend to deliver water
directly to the roots and avoid wetting the leaves. Experts recommend the equivalent of 1 inch of
rainfall per week during the growing season.
8. Prune like a pro
“Modern roses don’t need as much pruning as most people think. However, an established rose bush appreciates a basic pruning in early spring,”
It’s almost impossible to kill a rose bush by over pruning, but if you follow a few simple rules, the results will look more professional and result in a healthier plant. A good pair of bypass pruners (not anvil style) and rose pruning gloves can make the job even easier.
First, remove all dead and damaged canes (any that look brown), then
cut back a third to a half of the previous year’s growth until you find
healthy, white centers inside the cane. If you live in a climate with a
dormant season, the best time to do a hard pruning is in early spring,
around March or April. However, you can lightly prune your roses all
season long to keep them well-groomed.
The only other pruning needed for most varieties of reblooming roses is deadheading to encourage blooms throughout the season. Just cut back below the first five-leaflet stem to promote regrowth. If your rose bushes are “self-cleaning,” which means they don’t develop rose hips, no deadheading is needed because the blooms will drop off automatically and the plants will keep on producing more flowers.
9. Keep them healthy
The best way to prevent rose diseases is to choose disease-resistant varieties. These roses are bred and selected to resist the most common rose afflictions, including powdery mildew and black spot.
* Powdery mildew typically appears during the summer, especially when the days are hot and dry and the nights are cool and wet. The tell-tale signs include leaves that curl and twist and the development of a white, powdery down on the leaves. To avoid powdery mildew, water plants at ground level in the morning, since wet leaves, especially overnight, provide the perfect growing environment. Pruning a rose bush to allow air to circulate through the foliage also helps prevent this powdery growth.
* Black spot is a waterborne fungal disease that appears as circular
black or brown spots on the top side of leaves, starting toward the
bottom of a bush and working its way up, eventually causing defoliation.
Prevent this disease the same way you prevent powdery mildew, by
improving air circulation through the plant and watering at ground
level. A simple mixture of baking soda and horticultural oil can help
fight the spread of black spot, or use an organic 3-in-1 fungicide.
* Pesky insects that like to feed on rose bushes include aphids, Japanese beetles, spider mites, and sawflies. Most of these pests can be controlled with neem oil or insecticidal soap. In the case of aphids, a blast of water from a hose in the morning is often the only treatment necessary.
For the most part, roses are tough and resilient and will thrive with minimal pampering. Newer varieties of roses are much more vigorous and much more disease resistant than older varieties.”

10. Show them off
Of course, one of the greatest pleasures of planting garden roses is the harvest. Roses have long been prized for their beautiful and fragrant cut flowers, but no roses are lovelier than those gathered fresh from your own garden. Here are a few rules of thumb for preserving your cut roses as long as possible:
- Roses will last the longest when they are cut immediately after the bud stage, when the petals are starting to open.
- Use hand pruners or garden scissors with sharp blades to cut the stems without damaging their water uptake channels.
- Cut roses when they are dewy fresh and hydrated, either early in morning or during the evening, so the plant isn’t stressed from hot weather and sun exposure.
- A 45-degree angle cut of the stems prevents them resting flat on the
bottom of the vase. Trim the rose stems right before putting them in a vase to
eliminate any air bubbles that will prevent them from taking in water.
- Strip off any lower leaves that fall below the water line to avoid rot and bacterial growth. Above the water line, leave as much foliage as possible, which will help to draw up water.
- Change the water frequently — daily if possible — to remove any bacteria. Also re-cut the flower stems every few days to improve water absorption.
Posted 365 weeks ago
Just enjoy!
Yesterday, I was blessed to have a visit from a friend who lives in northern Ohio. She told me, “It is cold, grey and feels like early February rather than nearly April” at her house.
I wanted her to feel like spring has indeed arrived. She was welcomed by these sights of my cozy yard… The forecast says 70′s by midweek. Truly March is going out like a lamb.


Posted 376 weeks ago
Shrimp & Asparagus Risotto
A favorite dish for a dinner on the patio
Prep time: 30 minutes Cook time: 30 minutes Serving size: 4
Ingredients

- SIMMER chicken broth in a large pot on low heat until needed.
- HEAT oil in a large nonstick pan over medium heat. Add onions and cook for 3 minutes, or until translucent. Stir in rice and cook for 1 minute, then add white wine. Add ½ cup of broth and stir until completely absorbed. Repeat until half of broth has been added. Stir the risotto frequently to prevent sticking.
- ADD asparagus and shrimp to the remaining broth and cook for about 2 minutes, or until shrimp are pink. Remove asparagus and shrimp from broth and add them to the risotto mixture. Add remaining broth ½ cup at a time until desired creaminess is reached (there may be broth left over).
- Once the broth is absorbed, add butter, Parmesan cheese and salt and pepper to taste. Garnish with chopped tomatoes and parsley.
Posted 377 weeks ago
Wildlife Photography in Your Backyard

hummingbird in my hummingbird vine
Your Wildlife Haven
One of the benefits of having a garden with water features and plants that attract pollinators is that it also is a haven for wildlife. I love spending time in my backyard paradise, and what better way to chronicle your personal Eden and its natural visitors than photography.
Advances in digital photography are making it easier than ever to capture stunning images of wildlife. Using some quick tips from lenses to camouflage, you can get the same type of results the pros do.
Wild Critters are Shy

Most undomesticated animals prefer to keep their distance from humans, so having a telephoto lens is crucial for wildlife photography. If you’re shooting with a DSLR or “mirrorless” camera, use a zoom lens with a focal length of at least 200mm. If you’re using a point-and-shoot, opt for a camera with at least a 60x optical zoom, such as the Nikon Coolpix P900 or Canon Powershot SX60 HS. I use the Nikon Coolpix.
Avoid the Flash
Professional
wildlife photographers avoid using a flash. Not only is a sudden burst
of light a great way to startle a wild animal, but the flash also tends
to produce unnatural harsh lighting. Consider also that your flash will not be powerful
enough to reach your subject from a distance. If your camera has a
built-in flash, remember to disable it before you begin shooting.
The Need for Speed
It’s easy to end
up with blurry wildlife photos. Darting animals and
intensified camera shake caused by using a long lens makes it hard to get a clear photo. To ensure your pictures stay sharp, shoot most animal encounters at 1/1000th of a second. To
freeze an especially fast creature, (think bolting deer or a soaring hawk), use a shutter speed of at least 1/4000. When shooting on an
overcast day or when the sun is low in the sky, plan on cranking up your
ISO to 1000 or more to maintain a correct exposure.
In addition to shooting with a fast shutter speed, it’s good practice to capture action shots using your camera’s rapid-fire or “burst mode” setting. Most cameras can take between 3 and 20 images per second, increasing your odds of nailing the perfect shot. Remember to use a memory card with a write speed of at least 95MB/second so your camera doesn’t seize up while processing the photos.
Ready for your close up?

A macro lens is a great tool for
shooting small reptiles and tiny insects that typically go unnoticed.
These close-range lenses are available for most DSLR and “mirrorless“
camera models, and some point-and-shoots have a built-in macro setting
to switch on. Macro photography forces you to get close to
your subject, so move slowly and avoid making any sudden
movements.

Wild horses on Chincoteague Island, VA
Be Invisible
To photograph wild animals in their natural state, you may need to go incognito. Professionals will wear camouflage clothing or use a hunting hide to disguise themselves. In your backyard you may only need to sit still and be quiet. If you can, opt for a camera with a quiet shutter, or wrap fabric around your camera to help muffle any noises.
Be Patient
The best wildlife photographers
possess Zen-like patience, waiting entire days for their perfect shot. Most people will not go to such
great lengths, but you should still expect to wait a while for the right
shot to present itself.
WANT MORE?

Where the Wild Things Are
Can’t get enough? Or maybe squirrels no longer satisfy you? It may seem like a no-brainer, but to take photos of extreme wildlife, you’ll need to venture beyond your backyard. Head to a local nature preserve or wilderness area. Zoos and aquariums are convenient places for sharpening your wildlife photography skills. Consider booking a safari, guided nature tour or whale-watching excursion to get up close and personal with the animals you want to photograph.
Time it Right

Dawn and dusk are ideal times for
shooting wildlife. Not only will you avoid the harsh midday
sun, but many animals are more active during these hours because the
temperature tends to be cooler. If you’re trying to photograph a
particular species, do some research to find the best time.
Safety Dance
Do not put yourself in
danger while trying to get the perfect shot. Safety is your first priority, be it finding a stable, sturdy vantage point to shoot from or photographing dangerous predators. The safest way to
photograph large carnivores, such as grizzly bears or big cats, is from a
vehicle. If that’s not an option, shoot with the longest lens you have
and arm yourself with bear spray and bear bangers, just in case your subject turns aggressive.
No Enticement

Nature photography organizations consider baiting wildlife with food an ethical taboo due to the harmful effect on the animals. If ethics aren’t enough to dissuade you, many states impose steep fines to photographers offering food to wild animals, and photo contests won’t accept baited shots.
That being said, it’s generally
acceptable to lure pigeons and seagulls using bread crumbs (they eat
human scraps off the ground anyway), or you can set up feeders to
attract birds to your backyard.
Posted 380 weeks ago
Don’t Forget the Camera
OR THE PHONE
When I am gardening, especially when I am gardening, I forget to bring the camera. Sure these days it is much easier to capture a moment with your phone, provided you have it with you, it is charged up and easily accessible. Seventy percent of the time, the phone is in the house or elsewhere, not in my back pocket.
It is so easy to capture a flower, plant or scene. All I have to do is run back into the house and grab the phone. Everything stays exactly as I left it. But those unexpected moments: the surprise visitor. The fleeting rainbow. They are much harder to capture even if you are prepared.
Some exceptional surprises can occur in your own backyard. You need to be on the lookout for them and have a phone or camera handy.
Just yesterday, I spied the neighbor’s dog with what looked like a large ball in its mouth. She brought it up to their the back porch and deposited it. That’s when I could see it was a dead possum. Or was it? The dogs were called inside and in 10 minutes the possum resurrected itself and trotted off. Did I have my phone? My camera? Of course not!
Less than an hour later I saw not one, but two, red shouldered hawks in my Persimmon tree. You would think that I would have retrieved my phone after seeing the possum revive, yes? No!
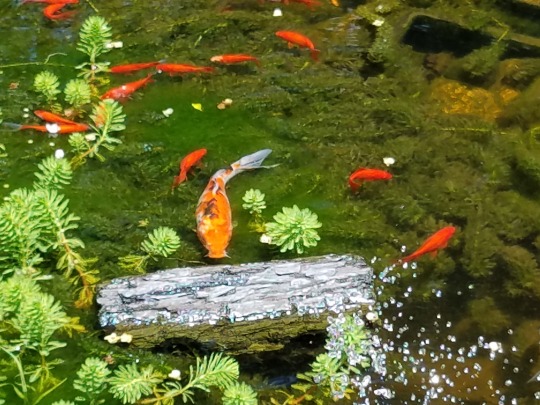
Among some of the critters I have seen in my backyard are groundhogs, hawks, possums, raccoons, blue tailed skinks, birds of all sorts, butterflies, frogs … You get the picture. In most cases however, I did not. All because I did not have my phone!
Here are some of the ones I did:
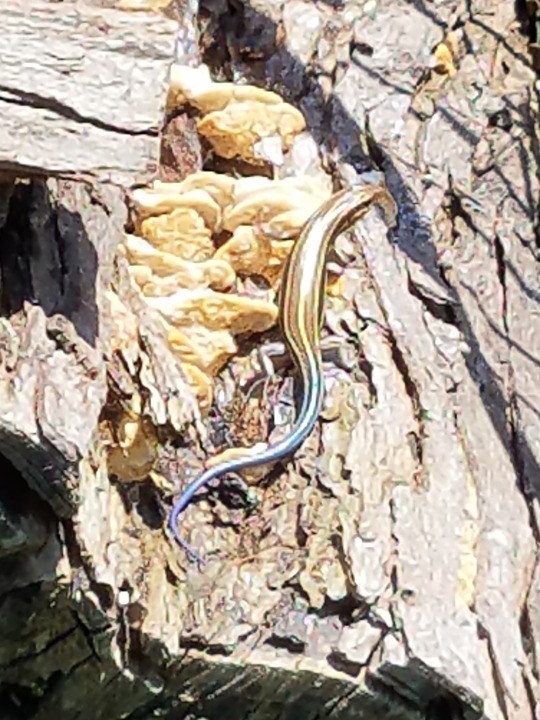
A blue tailed skink. Did you know only the females and young sport the trendy tail? It is a defensive characteristic. Predators go for the pretty tail, which is detachable, giving the lizard a chance to escape.

This turkey was far away. The phone could not focus in on her well.


These last few of hummingbirds were taken with a Nikon Coolpix 900. I sat very still on my porch for hours trying to get these photos.

A photo of a deer in a NJ snowstorm. Courtesy of my brother, Duane Rodgers.
Posted 380 weeks ago